This year I’m planning to up my blogging game (and I’m dragging a few friends along too). To help me in this endeavour I’m attempting to take a slightly more organised approach with my blog and I figured it might be useful to share what I’m doing.
So this year I’ll be officially blogging like a mofo (and for more on that, just follow the link). Last year I attempted to blog like a … blogger, but with limited success. I managed to get some decent posts out, but there were also a lot of posts I intended to write that I just didn’t get around to for one reason or another. I also attempted to use Google Calendar to set up a blogging schedule. It worked great: I’d add an entry on a selected date including the title and some basic details for the blog post that I wanted to publish on that day; Google would send me a reminder; I’d then completely ignore the reminder and continue about my daily business.
This year I’m going to use Trello. I’ve learned a little bit about forming habits over the last year, so I’m going to persist with Trello until it either becomes an habitual, essential part of my blogging toolbox, or I decide that it’s really not working between us and it’s for the best that we go our separate ways and forget about Paris.
Before I start there are two important things you need to know about Trello:
- It’s completely free (there is a premium version, but you can do virtually everything you want to do with the free version)
- You can use Trello in almost any way you want to.
So remember: everything I’m writing about below is achievable with the free version (which is what I’m using), but it’s just the way that I’m using it. If you decide to go down the Trello path you may find a way that’s far better suited to however you want to work.
Boards, lists and cards
There’s plenty of information out there on how to use Trello, but just so you don’t need to disappear just as things are about to get interesting, this is what you need to know:
- Trello is based on the Kanban board principle. A board is basically your workspace. You can have as many boards as you want, and you would typically have one board per project.
- Within each board you set up multiple lists. This is how you organise different stages or areas of your project. The most typical set of lists would be: To Do, Doing, Done
- Each list contains cards. This is how you organise your tasks. In this case, each card represents a blog post. You can put quite a bit of information on a card, but I’ll leave it to the official documentation to tell you all about that.
My blog posts board
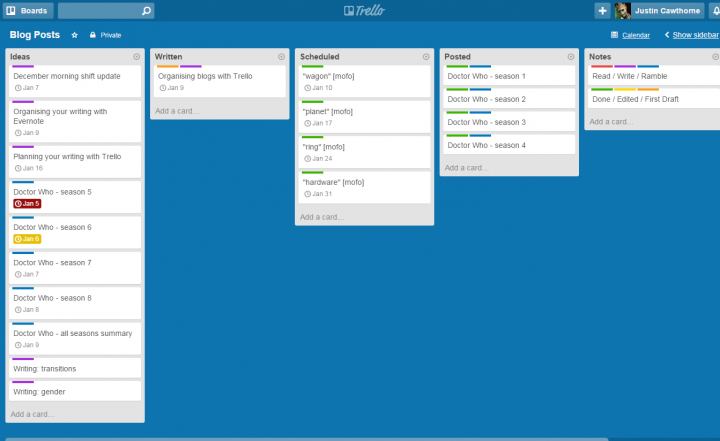
Below is the board I’ve set up for my blog posts.
Let’s go through them:
- Ideas – this is where I keep track of the blog posts I intend to write. Each card has a title, a description, if I need it, and a the date that I’m planning to write the post. I get a handy reminder 24 hours before the due date in case I forget.
- Written – while my standard practice has been to publish posts almost as soon as they’re written, I expect this year will find me writing posts as and when time allows, and then sitting on them until I’m ready to publish. This list will help me keep track of what’s been written but not published
- Scheduled – WordPress has a handy scheduling tool which I plan to make more use of this year, if only to maintain some regularity to my posting. At the moment this list is used to track ‘prompt word’ posts that I’ve scheduled ahead of time for the Blog Like A Mofo website.
- Posted – self-explanatory. You’ve gotta have somewhere to put the cards that you’ve completed, after all.
- Notes – this isn’t part of my workflow, but I’ll be sticking miscellaneous bits and pieces here. The two cards there at the moment help me remember the color coding I’ve set up for each card (oh yeah: you can have color coded labels for each card!)
It’s a pretty simple workflow: I note down the idea (following the GTD principle of getting the idea out of my headspace); the blog post gets written; scheduled if necessary; then posted. At the moment I’m using it to manage two blogs: this one and Blog Like A Mofo. I can already see that I might find it better to use the color coded labels to distinguish between the two blogs, but I’ll see how I go first.
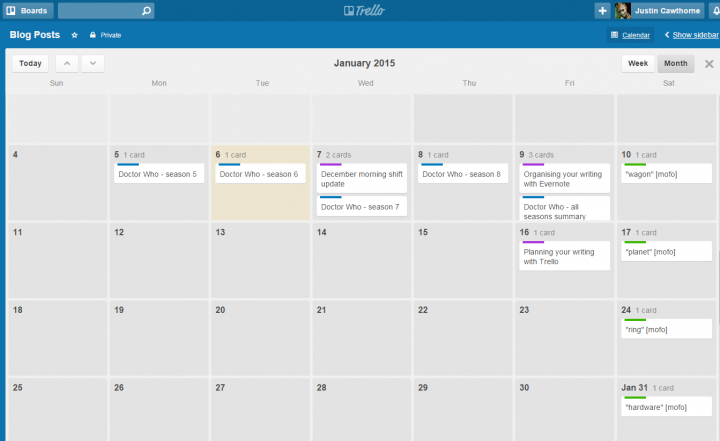
Calendar view
This is where using the due date feature really comes in handy. With a very simple tweak you can add a calendar view to each board which does exactly what you’d expect.
Even better, you can grab an ical feed for the calendar view and plug it into whatever calendar application you use so you can always see when your posts are scheduled. One of the other examples I looked at, the author had used the calendar view to highlight busy dates on which she might not be able to get a blog post down (you could use a ‘Busy Dates’ list to do this: all the lists in that board will appear on the calendar view).
And that’s it…
So there you go. I hope some of you find this useful. I’m also going to be using Trello, in a somewhat different way, for my creative writing, but that’ll be a subject for another blog post
If you are tempted to try out Trello, please use this link: https://trello.com/justincawthorne/recommend as it’ll give me a free month of Trello Gold every time anyone signs up 🙂


